Ingredients
Equipment
Method
- Step 1: Get started with the shortcrust dough! Put all ingredients for the shortcrust dough in a bowl and quickly knead them into a smooth dough. Do not knead too long, otherwise it will be tough. Form a ball, wrap it in plastic wrap and put it in the refrigerator for at least 30 minutes. This is important so you can process it well later.
- Step 2: Prepare the shortcrust base: Line the bottom of a springform pan (26 cm) with baking paper. Take the dough out of the refrigerator and press it evenly onto the baking paper base. Don't bother pulling up an edge.
- Step 3: Prick, prick, prick: Prick the dough base several times with a fork. This prevents it from bubbling.
- Step 4: Bake & cool the shortcrust: Preheat your oven to 180°C (350°F) top/bottom heat. Slide the shortcrust base into the oven for about 10 minutes until it is lightly golden brown. Take it out and let it cool COMPLETELY. This is super important before you continue.
- Step 5: Ready for the sponge cake? Now preheat the oven to 170°C (340°F) top/bottom heat. Grease the springform pan well (this time, don't forget the edge!).
- Step 6: First sponge cake run: Take 4 eggs and 160 g sugar. Beat both with the hand mixer or food processor for at least 6 minutes until really nice and creamy and light. The mixture should be almost white and have significantly increased in volume. This is the secret to a fluffy sponge!
- Step 7: Add flour and nuts: Briefly mix 130 g flour, 2 tsp baking powder, and 50 g ground nuts in a separate bowl. Now add this mixture to the creamy egg-sugar mixture. Gently fold the dry ingredients in with a rubber spatula or whisk. Do this very carefully in circular movements from bottom to top so that the air is not lost. Don't stir wildly!
- Step 8: Bake & cut (Part 1): Pour the batter into the prepared springform pan. Slide it into the oven for about 30 minutes (skewer test!). Take the base out and let it cool briefly in the pan, then cool completely on a wire rack. When it is completely cold, slice it horizontally once so you have two equally thick layers.
- Step 9: Second sponge cake run: Now repeat steps 6 through 8 exactly with the remaining 4 eggs, sugar, flour, nuts, and baking powder. This way you get a second sponge cake, which you also cut through once. In the end, you will have 4 sponge cake layers. Well done!
- Step 10: The magical cream base: Now for the cream! Heat the heavy cream in a pot. It should be hot, but UNDER NO CIRCUMSTANCES BOIL. Take the pot off the heat, add the chopped nougat, and stir briefly. The nougat will melt in the warm cream. Stir only until the nougat has melted and everything is combined.
- Step 11: Into the refrigerator: Pour the nougat cream into a bowl, cover it, and place it in the refrigerator for at least 3 hours (better overnight!). It must be Ice COLD, otherwise the cream will not set!
- Step 12: Finish the cream: Take the ice-cold nougat cream out of the refrigerator. Briefly whisk the mascarpone in a large bowl with the mixer until it is a little looser. Now add the chilled nougat cream to the mascarpone and beat everything with the mixer on the highest setting until very stiff. While beating, gradually sprinkle in the cream stabilizer. Beat until the cream is really firm and forms nice peaks.
- Step 13: Set aside decorating cream: Take about 6 heaped tablespoons of the finished cream and put it into a piping bag with a star nozzle. Keep this refrigerated until decorating.
- Step 14: The assembly begins! Place the shortcrust base on your cake plate. Place an adjustable cake ring or the clean springform ring tightly around it. Thinly spread the shortcrust base with apricot jam. This gives extra flavor and keeps the first sponge layer in place.
- Step 15: Layer by layer (1): Place the first sponge layer on the shortcrust base. Now spread about a quarter of the remaining cream on top.
- Step 16: Layer by layer (2): Place the second sponge layer on top. Spread about a third of the REMAINING cream (after subtracting the first quarter and the decorating cream) on it.
- Step 17: Layer by layer (3): Place the third sponge layer on top and spread half of the cream still remaining on top.
- Step 18: The lid goes on: Carefully place the last sponge layer on top.
- Step 19: Patience test in the refrigerator: Put the cake WITH the cake ring in the refrigerator for at least 2 hours (or even better overnight!). This is super important so that the cream sets and the cake is stable.
- Step 20: The final stage approaches: Take the well-chilled cake out of the refrigerator. Carefully loosen and remove the cake ring. Now spread the sides and the top of the cake with the remaining cream that is still in the bowl. Do this thinly first, this is the so-called "crumb coat" that binds loose crumbs.
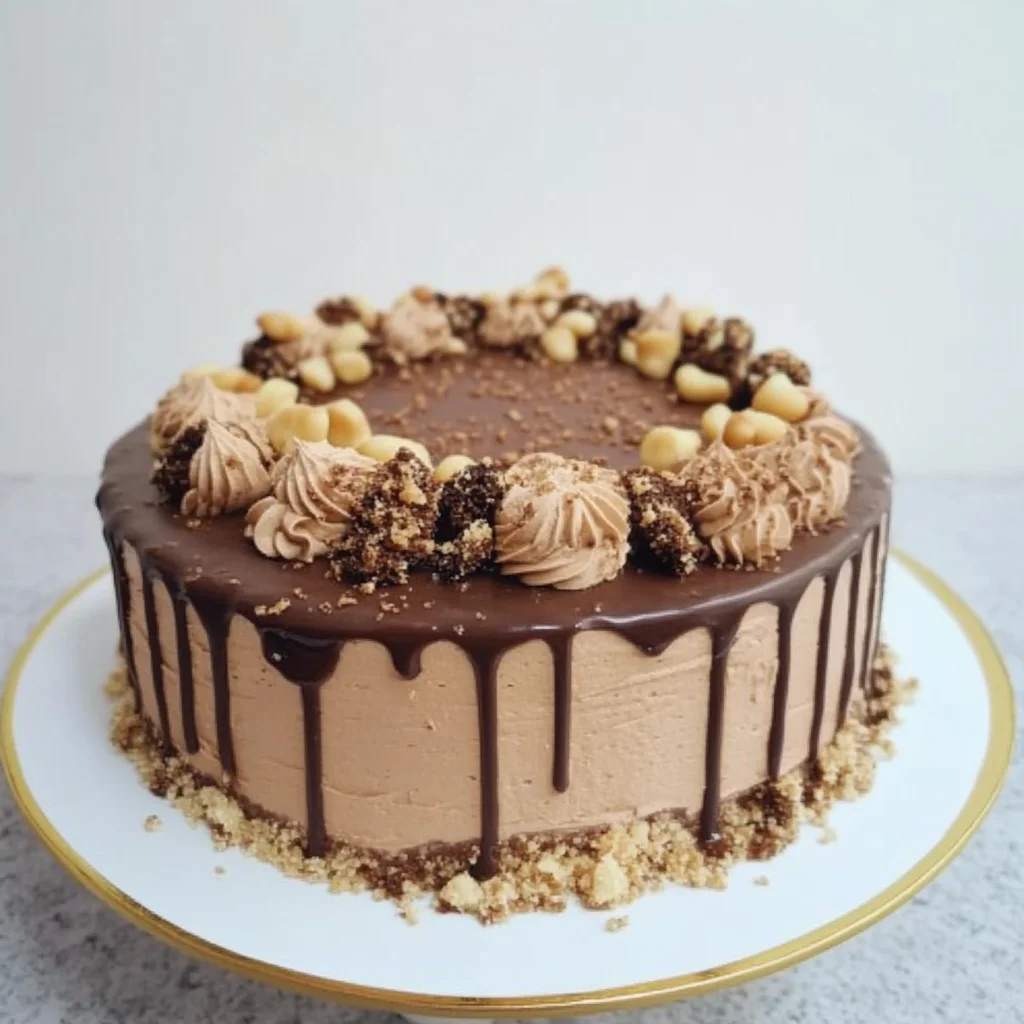
- Step 21: Decorate to your heart's content: Take the piping bag with the reserved cream and pipe swirls or rosettes on the cake. Melt some chocolate and let it drip in fine threads over the edge or make patterns on the surface. Scatter hazelnuts (whole or chopped) and the Giotto spheres on top. Let your creativity flow!
Notes
Tips for your perfect Hazelnut Cake: Use room temperature eggs for the sponge. Gently fold in dry ingredients for the sponge to keep it airy. The nougat cream MUST be ice-cold before whipping. Add cream stabilizer slowly while whipping the cream. Give the cake enough chilling time in the cake ring (at least 2 hours, better longer!) before removing it and decorating. Preparation saves stress: You can bake the shortcrust and sponge layers the day before. You can also prepare the nougat cream the day before and chill it overnight. Then assembly is quick on the next day.
Storage: The cake tastes best fresh, but kept covered (e.g., under a cake dome or loosely with plastic wrap) in the refrigerator, it will last for 3-4 days. Provided it's not eaten before then!