Ingredients
Equipment
Method
- Step 1: The Sponge Base: Separate the 4 eggs. Beat egg yolks, sugar, and water in a bowl until frothy and lighter. Briefly whisk in the oil. Mix flour and baking powder and gently fold into the egg yolk mixture. In a separate bowl, beat egg whites with a pinch of salt until stiff. Carefully fold the stiff egg whites into the batter. Pour the batter into a springform pan lined with baking paper or greased.
- Step 2: Baking: Preheat the oven to 180°C (350°F) top/bottom heat. Bake the sponge base for approx. 20-25 minutes until golden brown. Use a skewer test to ensure it's cooked through. Remove and let it cool completely.
- Step 3: The Cream Base: Place a heatproof bowl over a lightly simmering water bath. Add milk, 70 g sugar, vanilla sugar, and egg yolks. Heat while stirring constantly until the mixture slightly thickens. This takes a few minutes. Meanwhile, soak the gelatine in cold water. Once the egg yolk mixture has slightly thickened, remove the bowl from the water bath. Dissolve the soaked and well-squeezed gelatine in the warm mixture. Stir well until everything is dissolved. Stir in the rum and set aside to cool until it starts to slightly gel (it shouldn't be completely set yet, but noticeably thickened). This takes different amounts of time in the fridge or at room temperature, keep an eye on it!
- Step 4: Egg Whites and Cream: While the cream base cools, prepare the egg whites and cream. Beat the egg whites with a pinch of salt until stiff, slowly sprinkling in the remaining 25 g sugar until firm, glossy egg whites form. In another bowl, whip the cream until stiff.
- Step 5: Finish the Cream: Now comes the moment where everything comes together. As soon as the gelatine-egg yolk mixture has slightly gelled, add the stiff egg whites and whipped cream. Gently and carefully fold them in with a spatula so that the air remains in the cream and it stays nice and airy.
- Step 6: Assemble the Cake: Place the cooled sponge base (which you could slice horizontally if it's very high, but the recipe only calls for one base) back into the cleaned springform pan or a cake ring. Spread a thin layer of the finished cream on the base. Now prepare the sponge fingers: Briefly dip each biscuit (really just dip!) in milk or your chosen liquid and arrange them tightly on the cream layer. Add another layer of cream, then another layer of soaked sponge fingers. Spread the rest of the cream evenly over the cake.
- Step 7: Chill: The cake is now assembled! Place it in the refrigerator for at least 4 hours, but preferably overnight. It needs this time to set properly and the flavors to develop.
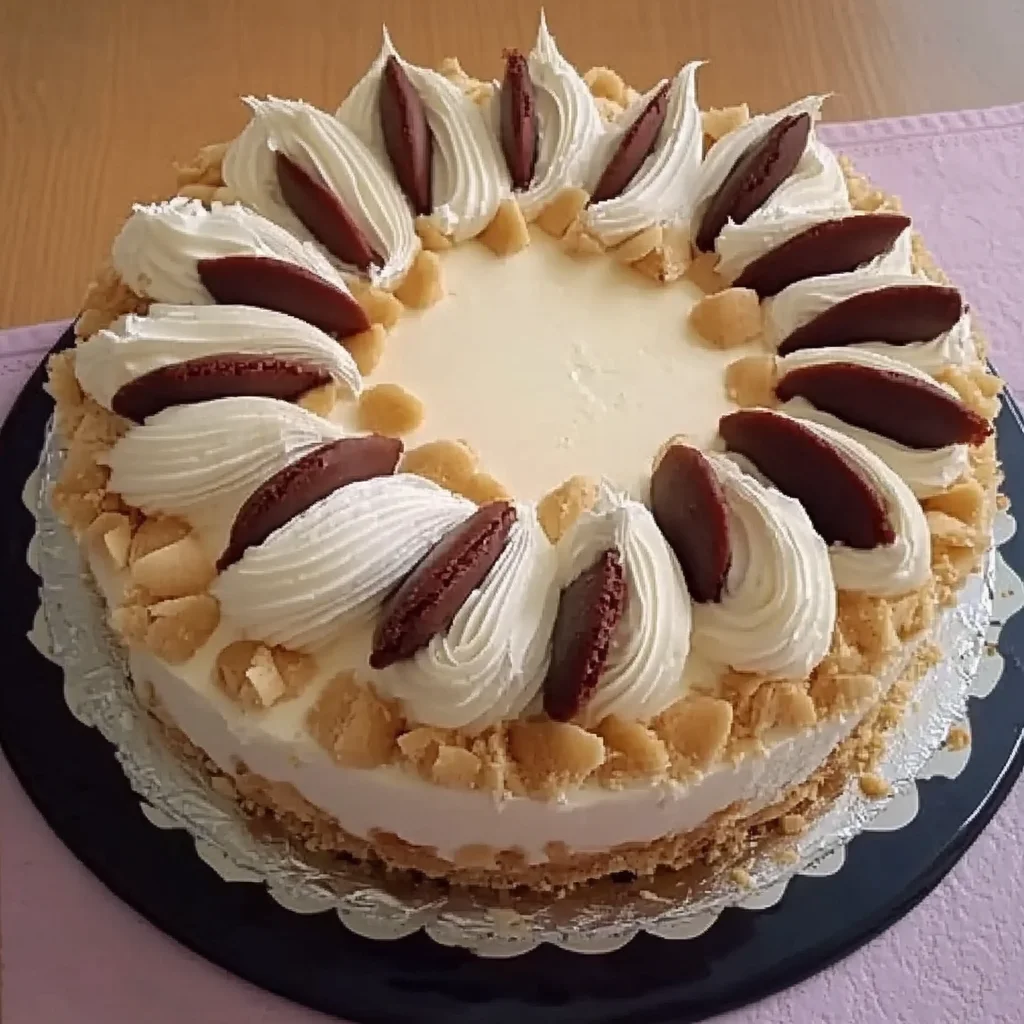
- Step 8: Prepare the Decoration: The next day or when the cake is firm, you can prepare the decoration. Melt the chocolate glaze according to package directions. Take 7-8 sponge fingers, dip the ends into the warmed glaze, and place them on baking paper to dry. Once the glaze is firm, you can optionally halve the biscuits. Lightly toast the sliced almonds in a dry pan over medium heat until golden brown, being careful not to burn them. They smell wonderful!
- Step 9: Decorate: Carefully remove the cake ring. If desired, whip some cream until stiff and spread it on the edge of the cake. Gently press the toasted almonds onto the edge of the cake. You can decorate the surface with cream rosettes (from the remaining cream or freshly whipped) and the chocolate-dipped sponge fingers.
Notes
Creative Variations: If you don't want alcohol, replace the rum with rum flavor, orange juice, or even cold coffee (for a mocha note). For soaking the sponge fingers, you can use milk, a mix of milk and rum/flavor/juice, or pure rum for adults (be careful not to make it too intense). Instead of almonds, chopped hazelnuts or walnuts also work well on the edge. You can use sponge fingers plain or dust the cake with cocoa powder instead of chocolate glaze. Add chocolate sprinkles on the cream or edge for extra chocolate.
Tips for Success: When adding squeezed gelatine to the cream base, ensure the base is no longer boiling but still warm enough for the gelatine to dissolve. Stir well! Dipping the sponge fingers correctly is crucial – just dip them very briefly, only for a second! Otherwise, they will fall apart and become mushy. Chilling time is essential for the cake to set properly. Plan for at least 4 hours, preferably overnight. Fold in the egg whites and cream gently to keep the cream airy. You can bake the sponge base a day in advance and let it cool completely. The cream base (without cream and egg whites) can also be prepared in advance and finished just before assembly.
Storage: If any cake remains (it rarely does!), store it well covered in the refrigerator. It will keep for 2-3 days. The cream and soaked biscuits might make it even moister. Freezing is possible, but the cream's consistency might change (become watery) after thawing. It's best enjoyed fresh or frozen briefly without decoration if necessary.